Thursday, February 27, 2014

Bringing 'The Heat'

Throwback Thursday!


My parents always let my sister, Catherine, and I try out different activities and sports. When we were kids at some point we did just about everything- jazz, ballet, cheerleading, soccer, swimming, softball, etc. Nothing really stuck long for either of us until I got into softball and Catherine got into cross country.

What can I say?... it was sunny!

When I was 10 years old, I turned to my dad and said "I want to play softball." Next thing you know, I was down at South Montgomery Girls Softball League (SMGSL) trying out for the 10 & under team. Thus started my six year stint of playing softball. I always had so much fun, but I was never that great. I remember striking out a lot, but getting a few good hits here and there. I also remember missing a lot of catches, but when Catherine and I played each other I caught her pop fly and I was on top of the world!


The first team I was on, The Heat, won first place in our league and I got a huge trophy that I still have in my room at my parents' house. In following years I played on the Lady Titans, the Vipers, and a few other teams whose names I forgot. I also played on a tournament team one summer with Catherine. While I was a bench warmer about 80% of the time, I really enjoyed spending the time with my sister and my dad, who helped coach.

I'd like to think that this was a home run swing.


I'd like to think that this is a post ball throwing movement and not just me acting a fool...
but knowing me, that's exactly what I was doing. Why the hell was my hat on backwards?!


Sunday, February 23, 2014

Easy Homemade Vanilla Ice Cream

A few months ago, my sister called me and asked if I had any interest in owning an ice cream maker. As someone who loves to cook and also loves ice cream, of course, I said yes! She found a hot pink refurbished Cuisanart ice cream maker online for $35! A total steal and a bonus: I love hot pink! 

I absolutely love this ice cream machine! It makes it so easy to make homemade, personalized ice cream. I've made a few different flavors since I got the machine: cinnamon, cookies and cream, chocolate chip cookie dough, and chocolate almond. I've had a lot of fun girls days with this machine so far! 

I've made a few ice creams that are a vanilla ice cream base with something added to it. This is a great basic vanilla recipe that you can spice up and make into something even better. For example, this time we added chopped peppermint patties to ours... and it's delicious! 


This recipe is really fast and easy and requires no baking!

My ingredients look like an advertisement for Kroger,
but since there is one less than half of a mile from my house, I guess that makes sense.


For this recipe, you're going to need:

2 cups half & half
2 cups whipping cream
3/4 cup granulated sugar
1 tablespoon vanilla
1 quart ice cream maker


This is really simple!

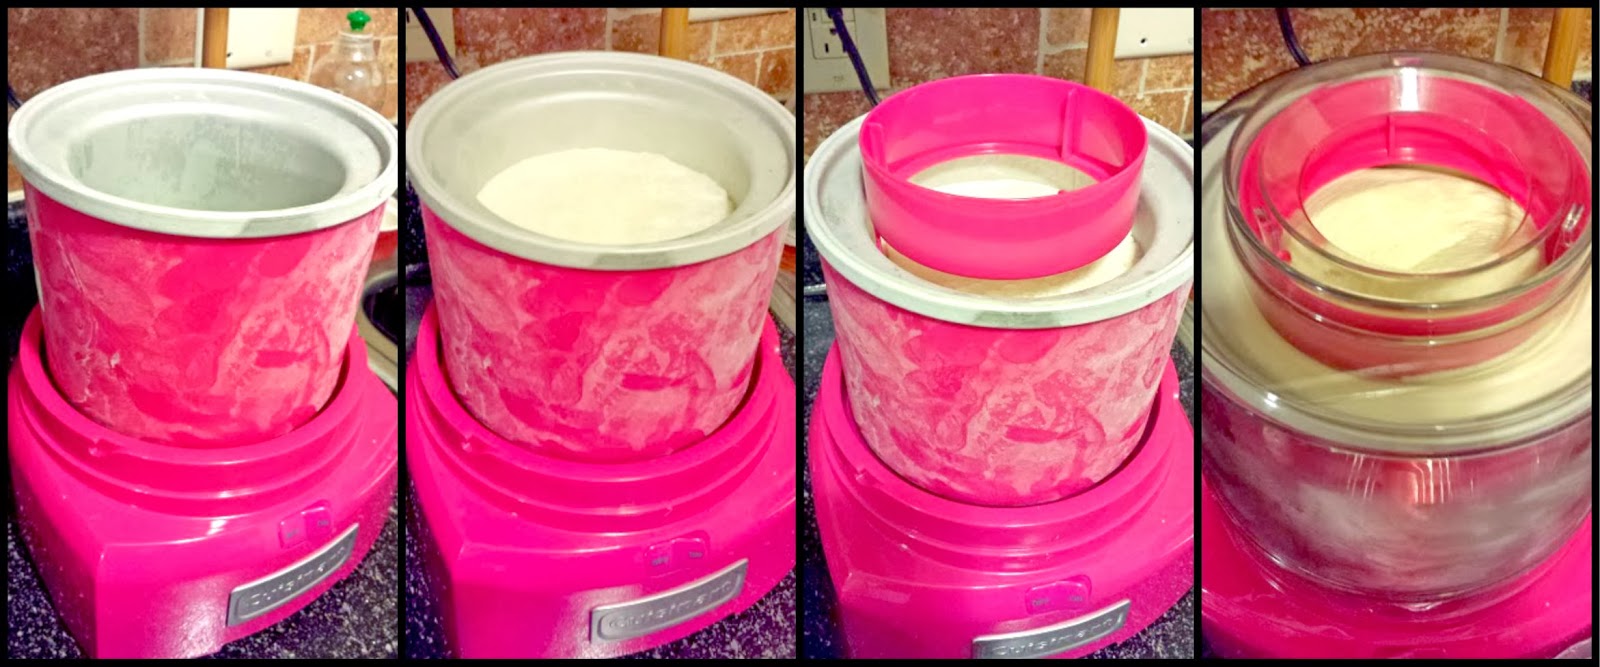
Before you begin, make sure that your ice cream maker bowl is frozen.
I keep mine in the freezer overnight if I plan ahead,
if not it typically takes a few hours to freeze completely. 

1. Whisk together half and half and whipping cream.
Gradually whisk in sugar until blended well.


2. Whisk in vanilla.


3. When you are finished whisking, place bowl in freezer for
30 minutes to an hour or until it's really cold.


4. When the mixture is chilled and you're about to start churning,
get your frozen ice cream maker bowl out of the freezer and place it on your machine.
Pour in ice cream mixture, put churning attachment in bowl and lock lid on.
Turn machine on and churn until mixture is frozen- it took my machine about 15 minutes.


5. Spoon/scrape ice cream out of frozen bowl and into a freezer safe, air-tight container. Stir in whatever mix-ins you want and place in freezer to allow ice cream to freeze further to firm up. I put it in the freezer overnight. 


Friday, February 21, 2014

Key Lime Coconut Cookies

Now that the weather is getting warmer, I decided to try out a new warm-weather recipe- citrus & coconut! Once again, found this recipe via Pinterest on Will Cook for Smiles.  I had the evening to myself and decided to make a yummy treat to take to work on Friday! They turned out really delicious- you can taste the lime flavor without it being overwhelming and the cream cheese makes them super moist! This recipe is definitely worth a try if you're looking to bake something new! 


Ingredients
3 oz. cream cheese, room temp, cut into small pieces
Zest of 2 key limes
1 cup sugar
1/2 cup butter, melted and still warm
1 egg, room temperature
1 tablespoon whole milk
Juice of 2 key limes
2 & 1/4 cups all-purpose flour
1/2 teaspoon salt
1/2 teaspoon baking soda
1 teaspoon baking powder
1 cup shredded, sweetened coconut
1/2 cup powdered sugar, for rolling dough in

Directions
1. Preheat oven to 350F and prep your cookie sheet. I use a silpat on mine so cookies bake evenly and don't spread too much.

2. Place cream cheese, lime zest, and sugar in medium/large size bowl. Pour warm butter on top. Whisk until combined. 

Cream cheese. Room temperature and cut into small pieces.

Lime zest of 2 key limes. They're tiny so they're hard to zest!

Add lime zest to cream cheese in bowl.

Mix well. 

3. Add lime juice, egg, and milk. Whisk until combined.

Add lime juice.

Add egg.

Add milk.

4. Add flour, baking soda, baking powder, and salt. Mix well.

Add dry ingredients.

Mix well.

Scrape dough off sides of bowl.

5. Add coconut and stir in with rubber spatula.

Add coconut.
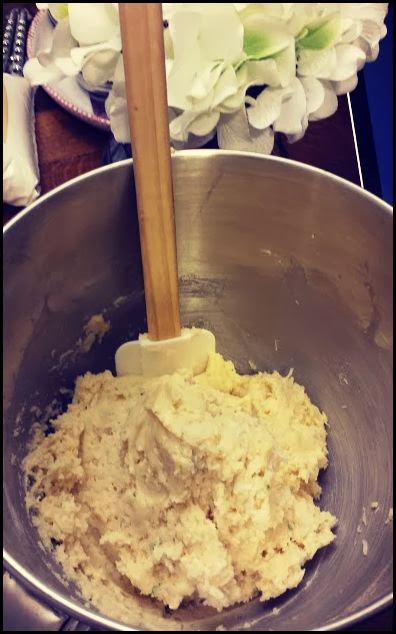
Close-up of finished dough.

6. Roll dough in hands to create 1-inch dough balls. Roll in powdered sugar and place 2-inches apart on cookie sheet. 

Small bowl of powdered sugar to roll the dough balls in.

1-inch balls placed 2 inches apart.

Dough rolled in powdered sugar.

8. Bake for 10-11 minutes. Color should be very lightly browned. 

Ta-da!

Wednesday, February 19, 2014

Fabulous in Flowers

Throwback Thursday to this sweet sister potrait of Catherine and I when we were kids. I remember taking family/sister photos outside of Teach-a-Tot every once in a while when we were younger. 

Check out our sweet matching dresses!

Love you, Catherine!


Sunday, February 16, 2014

My New Favorite Home Decorations

This "crafting" post isn't about me being crafty,
but about some awesome prints that someone else created.  

When I studied abroad in Italy in 2011 I was surrounded my architecture and art students that could draw, paint, and create amazing things. Their skill definitely made me wish I was more artistic. Chelsea worked at the Santa Chiara while I was there and ever since I came across her artwork for sale online, I've been thinking about which ones I want.

My mom purchased five of her prints for me this Christmas. I am so excited to have these beautiful reminders of my time in Italy hanging in my home. It took me a few weeks to get them framed up and hung (I procrastinated a little on the hanging part), but they're finally up and I love them! 

Check out Chelsea's artwork of Italy, Europe, & more here


Saturday, February 15, 2014

Brown Sugar Oatmeal Coconut Cookies

I really enjoy baking and recently I've been on a cookie-baking kick. Thankfully, I have a captive audience to feed by sugary concoctions to, my coworkers. Here's yet another recipe that I've tackled recently. I ran across this recipe on Pinterest and thought it would be a fun one to try since it's not a typical cookie combo. They turned out pretty delicious. I'd make them again!


Brown Sugar Oatmeal Coconut Cookies

*This recipe makes 3.5-4 dozen cookies!!
I didn't realize that until after I had started mixing ingredients.
Half the ingredients for half the cookies.*


Ingredients
1 cup butter
1 & 1/4 cup brown sugar, packed
3/4 cup granulated sugar
2 teaspoons vanilla extract
2 eggs
1 teaspoon baking soda
1 teaspoon baking powder
1/2 teaspoon salt
2 & 1/4 cups all purpose flour
1 cup quick oats
1 & 1/2 cups shredded, sweetened coconut

Directions
1. Preheat oven to 350F.
2. Cream together in large bowl: butter, brown sugar, granulated sugar. Cream until nearly smooth.

Softened butter.
Add brown sugar.

Add granulated sugar.

3. Add one egg, mix well. Add second egg, mix well. Add vanilla and mix until everything is evenly incorporated.
Add eggs one at a time. Mix well.
Mixture after eggs are combined.
4. Add baking soda, baking powder, and salt to the wet mixture. Mix thoroughly.

Add baking soda, baking powder, and salt.

Mixture after baking powder, baking soda, and salt are mixed in.

5. Add 1 cup of flour and mix until just incorporated. Scrape sides of bowl so all of dough is at bottom of the bowl. Add 1 and 1/4 cups flour and mix until just incorporated.

Add 1 cup of flour.
Mix first cup of flour into mixture.
Add remaining flour. Mix well.

6. Add oats and coconut. Mix until just incorporated- about 10-15 seconds.

Add oats.

Add coconut.
Only mix oats and coconut in for about 10-15 seconds. 

7. Using your hands, roll rough into 1 and 1/2 inch balls. Place on silpat covered cooking sheet 2 inches apart from each other- they will spread.

Form 1 and 1/2 inch dough balls. 

Place dough balls 2 inches apart on the cookie sheet/silpat.

8. Bake for 8-10 minutes. Cookies should be just lightly browned around the edges. Cookie should be very moist and chewy in the center.


Yum! Enjoy!!

If I make these again, I may add a teeny bit of coconut extract or something to give it a little kick of flavor. The cookies are delicious, but the three big ingredients- brown sugar, coconut, and oatmeal- have relatively mild flavors. Although yummy, they need something to give them a little more. 

Recipe borrowed from this blog.